
- Log in to the Azure portal at https://portal.azure.com ➢ navigate to the Azure Synapse Analytics workspace you created in Exercise 3.3 ➢on the Overview blade, click the Open link in the Open Synapse Studio tile ➢ select the Manage hub item ➢ in the External Connections section, click Linked Services ➢ click the + New button ➢ and then look through the services that can be connected to. Figure 3.33 shows a few options.
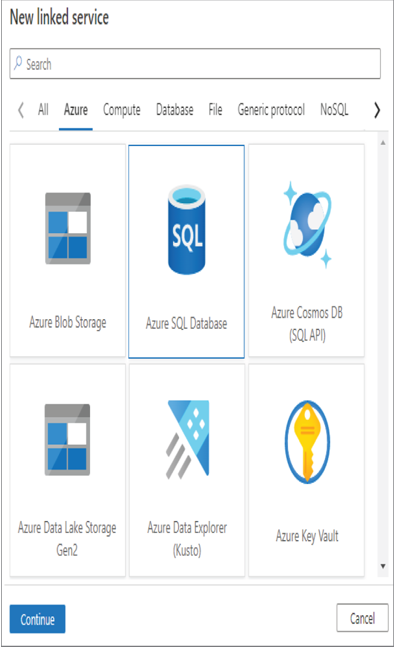
FIGUER 3.33 Azure Synapse Analytics External connections Linked services
- Select Azure SQL Database ➢ click Continue ➢ use the database you created in Exercise 2.1 ➢ provide a name (I used BrainjammerAzureSQL) ➢ add a description ➢ hover over the information icon next to the Interactive Authoring Disabled message ➢ click the Edit Interactive Authoring link ➢ enable interactive authoring ➢ select the Azure subscription where the Azure SQL database is linked to ➢ select the server name and database name ➢ leave SQL authentication as the authentication type ➢ and then enter the user name and password. The configuration should resemble Figure 3.34.
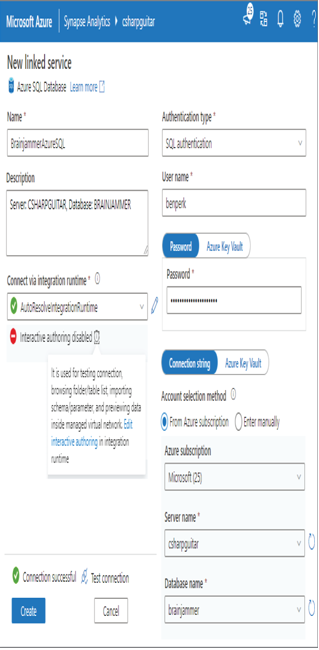
FIGUER 3.34 Azure Synapse Analytics Linked Azure SQL Database
- Click the Test Connection link, and then click Create. Once enabled, you will see something like Figure 3.25.
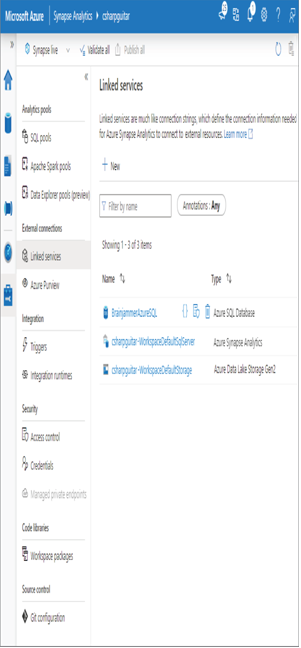
FIGUER 3.35 Azure Synapse Analytics linked services
- Select Apache Spark Pools ➢ click the + New link ➢ provide an Apache Spark pool name (I used SparkPool) ➢ choose a node size family ➢ choose your autoscaling settings ➢ click Next: Additional Settings ➢ and then create a .txt file with the following content:
spark.sql.hive.metastore.version 0.13 spark.hadoop.hive.synapse.externalmetastore.linkedservice.name BrainjammerAzureSQL spark.sql.hive.metastore.jars /opt/hive-metastore/lib-0.13/:/usr/hdp/current/ hadoop-client/lib/
Upload the file using the File Upload text box in the Apache Spark configuration section, and then click Upload. Note that there must be only three lines in the code snippet. The third line might break due to formatting. A file example named metastore.txt can be downloaded from the Chapter03/Ch03Ex04 directory on GitHub at https://github.com/benperk/ADE.
- Click the Review + Create button, and then click Create.
- Once provisioned, select Develop from the navigation menu ➢ click the + ➢ select Notebook ➢ in the Attach To drop‐down, select the Spark pool you created in step 4 ➢ enter the following commands into the cell ➢ and then run the following commands. The output will be like that shown previously in Figure 3.24.
spark.sql(“show databases”).show() spark.sql(“show tables in brainjammer”).show()
When you navigate to the Additional Settings tab, you will see a page that resembles Figure 3.30.
If you have problems with the previous exercise, it might be because you have not yet instantiated the Hive metastore itself. You can achieve this in numerous ways, one of which is described in Exercise 3.14.
Notice that you used the linked service name you created in step 2 of the previous exercise as part of the .txt file as the Apache Spark configuration file. Passing that to the startup process loads the linked service configuration into memory and uses its contents to make the connection. In addition to a configuration file, you might see this linked service name used as the value for DATA_SOURCE when in the context of COPY, CREATE EXTERNAL TABLES and BULK INSERT SQL command statements. Review those commands in Chapter 2 as a refresher, as necessary.