
- Log in to the Azure portal at https://portal.azure.com ➢ navigate to the Azure Synapse Analytics workspace you created in Exercise 3.3 ➢ on the Overview blade, click the Open link in the Open Synapse Studio box ➢ select the Manage hub item ➢ click Git Configuration in the Source Control section ➢ click Configure (it is assumed you do not have an existing configuration) ➢ select GitHub from the drop‐down menu (notice that Azure DevOps Git is also available) ➢ and then enter your GitHub user name. Once the configuration resembles Figure 3.45, click Continue.
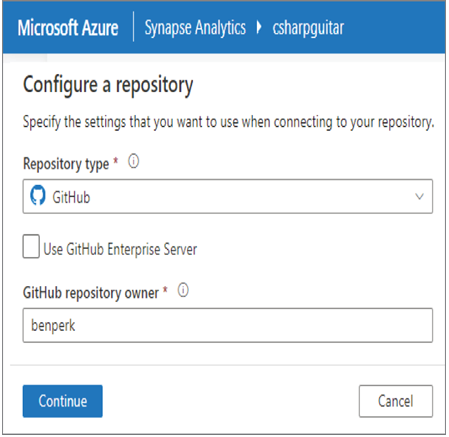
FIGUER 3.45 Azure Synapse Analytics configure GitHub
- Click the Authorize azuresynapse button ➢ enter your password ➢ click the Select Repository radio button ➢ choose a name for the repository where you will store your code and/or configurations ➢ choose the Collaboration branch ➢ and then choose the Import Resources into This Branch value. Leave the other values as default. Figure 3.46 represents how this might look. Click Apply.
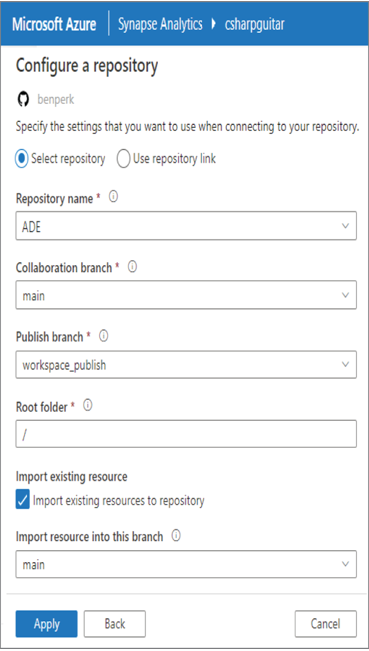
FIGUER 3.46 Azure Synapse Analytics configure GitHub repository
- Select the Use Existing radio button on the Set Working Branch window ➢ leave the default value of Main ➢ and then click Save. Once the configuration is complete, you should see something like Figure 3.47.
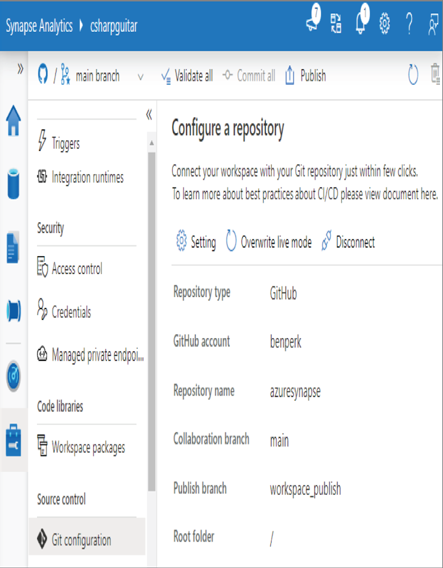
FIGUER 3.47 Azure Synapse Analytics configure GitHub saved
You should not make public the repository where you store the Azure Synapse Analytics content, because it contains some sensitive information—for example, your Azure subscription number and the general configuration of your workspace. In many scenarios the configuration of your workspace environment is proprietary and highly confidential. Additionally, this scenario is a simple one, which is why you were instructed to choose the main branch. In an enterprise scenario, where there are teams working together to build the data analytics solution, you will likely have numerous branches. You should spend some time building the design of your source code repositories based on the requirements of your organization. Doing that is outside the scope of this book.
Data
The Data hub is the place where you can get an overview of all the data sources that are directly available to the Azure Synapse Analytics workspace. In Exercise 3.4 you created a linked service. Do you remember what those are and what they are used for? Remember that you gave that Azure SQL linked resource a name that can be used as a parameter in scenarios like CTAS statements or bulk inserts. You will see two tabs in the Data hub: Workspace and Linked. A linked resource, in this scenario, is not the same as a linked service; the similar name is a bit misleading. Instead of being a DSN, resources on the Linked tab support navigation and direct querying from the workspace itself. There are a few exercises later where you will see the difference. The Workspace tab includes items like dedicated SQL pools. The following subsections describe the rendered options after you click the + icon to the right of Data.
SQL Database
Take a moment to review the discussion around Figure 3.28 dealing with the process for provisioning a dedicated SQL pool. Follow the process and provision one yourself. Once the pool is provisioned, it will appear on the Workspace tab of the Data hub. Once you see the dedicated SQL pool, complete the Exercise 3.7, where you will create and query a staging table on a dedicated SQL pool in Azure Synapse Analytics.